Customizing your application
So far so good. The point is that usually, you won’t get enough by assembling
cubes out-of-the-box. You will want to customize them, have a personal look and
feel, add your own data model and so on. Or maybe start from scratch?
So let’s get a bit deeper and start coding our own cube. In our case, we want
to customize the blog we created to add more features to it.
Create your own cube
Once your CubicWeb development environment is set up, you can create a new
cube:
cubicweb-ctl newcube myblog
This will create a a directory named cubicweb-myblog reflecting the
structure described in Standard structure for a cube.
To install your new cube on the virtual environment, run in
the cubicweb-myblog directory:
All cubicweb-ctl commands are described in details in
cubicweb-ctl tool.
Note
We previously used myblog as the name of our instance. We’re now creating
a cube with the same name. Both are different things. We’ll now try to
specify when we talk about one or another, but keep in mind this difference.
Extending the data model
The data model or schema is the core of your CubicWeb application. It defines
the type of content your application will handle. It is defined in the file
schema.py of the cube.
Defining our model
For the sake of example, let’s say we want a new entity type named Community
with a name, a description. A Community will hold several blogs.
from yams.buildobjs import EntityType, RelationDefinition, String, RichString

class Community(EntityType):
    name = String(maxsize=50, required=True)
    description = RichString()

class community_blog(RelationDefinition):
    subject = 'Community'
    object = 'Blog'
    cardinality = '*?'
    composite = 'subject'
The first step is the import from the yams package necessary classes to build
the schema.
This file defines the following:
Of course, there are a lot of other data types and things such as constraints,
permissions, etc, that may be defined in the schema, but those won’t be covered
in this tutorial.
Notice that our schema refers to the Blog entity type which is not defined
here. But we know this type is available since we depend on the blog cube
which is defining it.
Applying changes to the model into our instance
Now the problem is that we created an instance using the blog cube, not our
myblog cube, so if we don’t do anything there is no way that we’ll see anything
changing in the instance.
One easy way, as we’ve no really valuable data in the instance would be to trash and recreated it:
cubicweb-ctl stop myblog # or Ctrl-C in the terminal running the server in debug mode
cubicweb-ctl delete myblog
cubicweb-ctl create myblog myblog
cubicweb-ctl pyramid -D myblog
Another way is to add our cube to the instance using the cubicweb-ctl shell
facility. It’s a python shell connected to the instance with some special
commands available to manipulate it (the same as you’ll have in migration
scripts, which are not covered in this tutorial). In that case, we’re interested
in the add_cube command:
$ cubicweb-ctl stop myblog # or Ctrl-C in the terminal running the server in debug mode
$ cubicweb-ctl shell myblog
entering the migration python shell
just type migration commands or arbitrary python code and type ENTER to execute it
type "exit" or Ctrl-D to quit the shell and resume operation
>>> add_cube('myblog')
>>>
$ cubicweb-ctl pyramid -D myblog
The add_cube command is enough since it automatically updates our
application to the cube’s schema. There are plenty of other migration
commands of a more finer grain. They are described in Migration
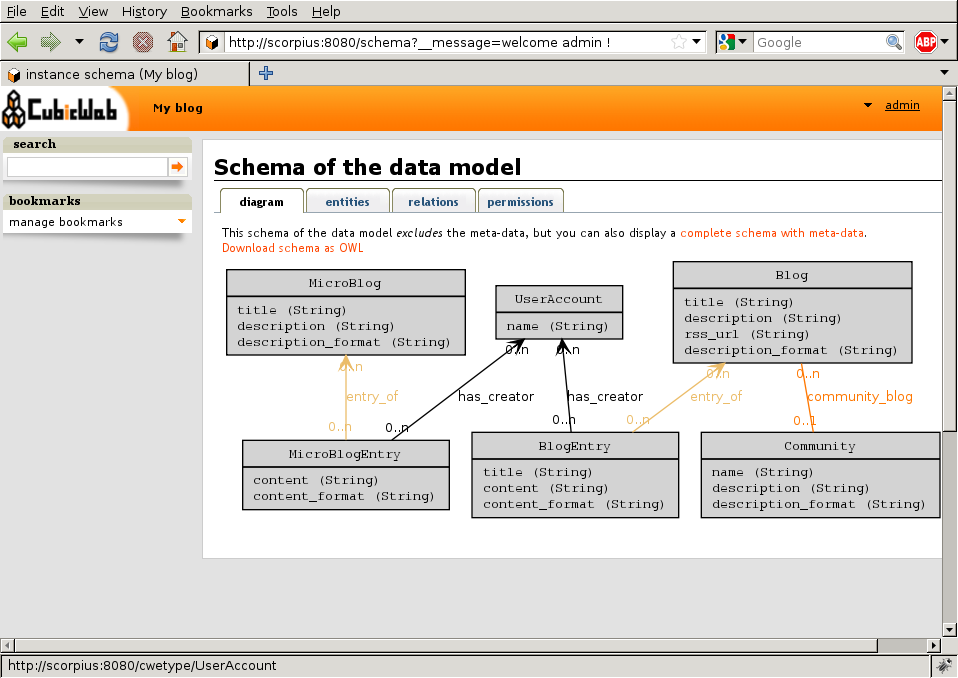
As explained, leave the shell by typing Ctrl-D. If you restart the instance and
take another look at the schema, you’ll see that changes to the data model have
actually been applied (meaning database schema updates and all necessary stuff
has been done).
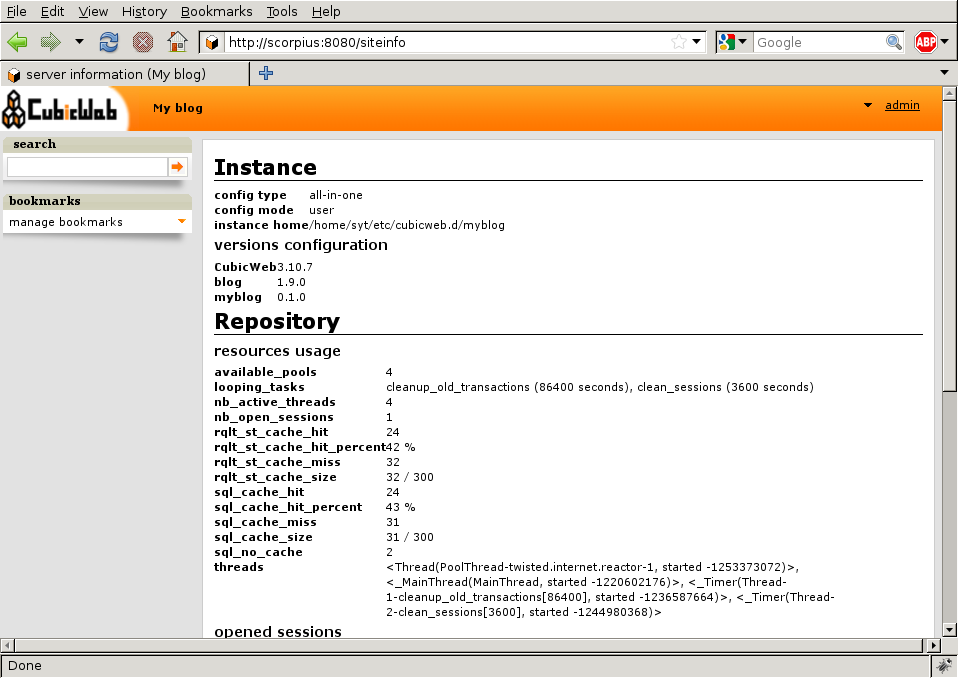
If you follow the ‘info’ link in the user pop-up menu, you’ll also see that the
instance is using blog and myblog cubes.
You can now add some communities, link them to blog, etc… You’ll see that the
framework provides default views for this entity type (we have not yet defined any
view for it!), and also that the blog primary view will show the community it’s
linked to if any. All this thanks to the model driven interface provided by the
framework.
You’ll then be able to redefine each of them according to your needs
and preferences. We’ll now see how to do such thing.
Defining your views
CubicWeb provides a lot of standard views in the directory
cubicweb/web/views/. We already talked about ‘primary’ and ‘list’ views,
which are views which apply to one ore more entities.
A view is defined by a python class which includes:
an identifier: all objects used to build the user interface in CubicWeb are
recorded in a registry and this identifier will be used as a key in that
registry to store the view. There may be multiple views for the same identifier.
a selector, which is a kind of filter telling how well a view suit to a
particular context. When looking for a particular view (e.g. given an
identifier), CubicWeb computes for each available view with that identifier
a score which is returned by the selector. Then the view with the highest
score is used. The standard library of predicates is in
cubicweb.predicates.
A view has a set of methods inherited from the cubicweb.view.View class,
though you usually don’t derive directly from this class but from one of its more
specific child class.
Last but not least, CubicWeb provides a set of default views accepting any kind
of entities.
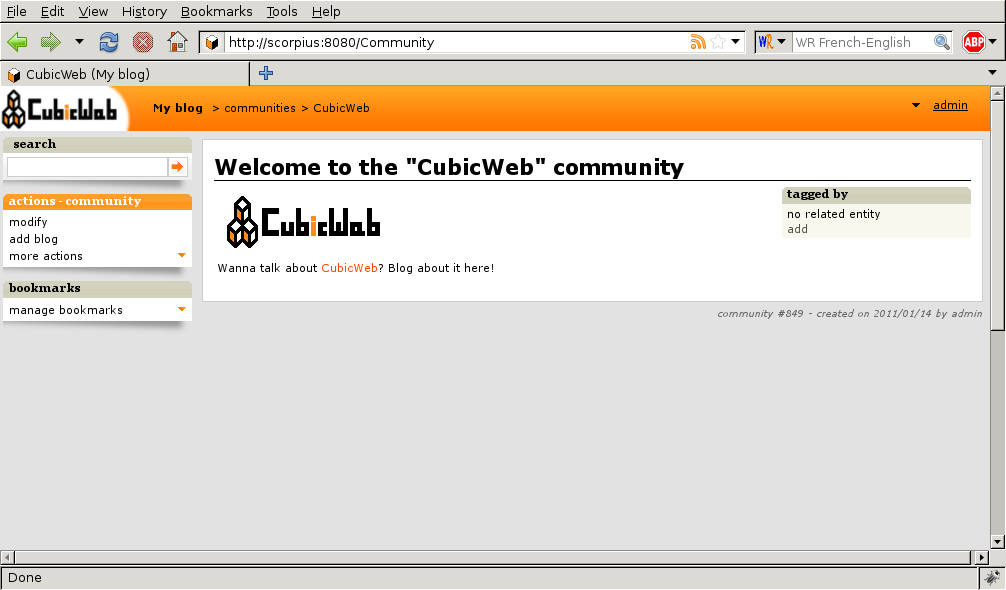
Want a proof? Create a community as you’ve already done for other entity types
through the index page, you’ll then see something like that:
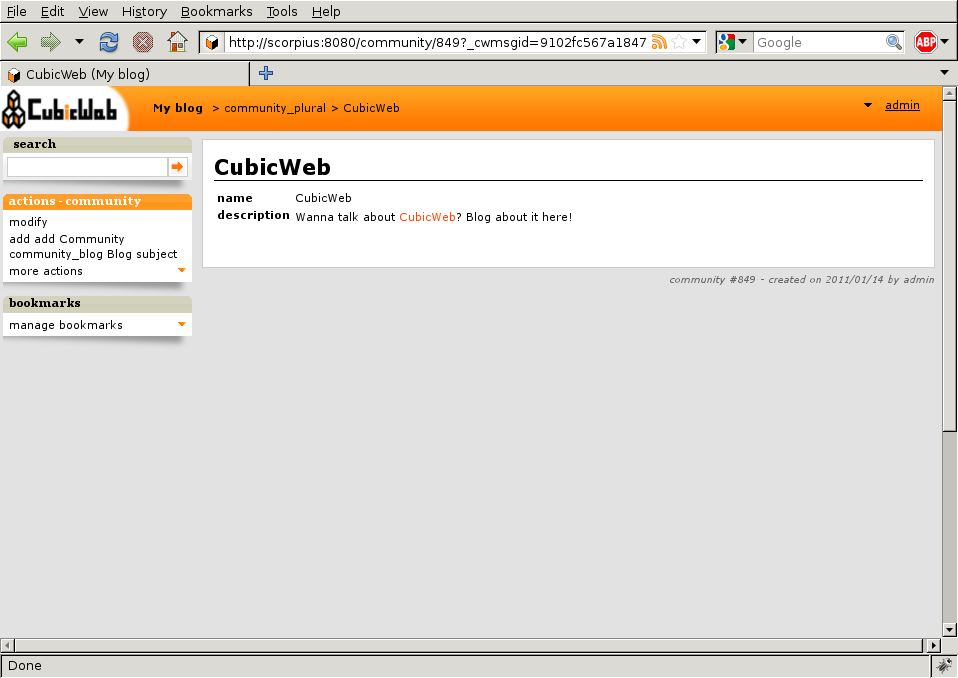
If you notice the weird messages that appear in the page: those are messages
generated for the new data model, which have no translation yet. To fix that,
we’ll have to use dedicated cubicweb-ctl commands:
You’ll then be able to redefine each of them according to your needs and
preferences. So let’s see how to do such thing.
Changing the layout of the application
The layout is the general organization of the pages in the site. Views that generate
the layout are sometimes referred to as ‘templates’. They are implemented in the
framework in the module cubicweb.web.views.basetemplates. By overriding
classes in this module, you can customize whatever part you wish of the default
layout.
But notice that CubicWeb provides many other ways to customize the
interface, thanks to actions and components (which you can individually
(de)activate, control their location, customize their look…) as well as
“simple” CSS customization. You should first try to achieve your goal using such
fine grained parametrization rather then overriding a whole template, which usually
embeds customisation access points that you may loose in the process.
But for the sake of example, let’s say we want to change the generic page
footer… We can simply add to the module views of our cube,
e.g. cubes/myblog/views.py, the code below:
from cubicweb.web.views import basetemplates


class MyHTMLPageFooter(basetemplates.HTMLPageFooter):

    def footer_content(self):
        self.w(u'This website has been created with <a href="http://cubicweb.org">CubicWeb</a>.')


def registration_callback(vreg):
    vreg.register_all(globals().values(), __name__, (MyHTMLPageFooter,))
    vreg.register_and_replace(MyHTMLPageFooter, basetemplates.HTMLPageFooter)
Our class inherits from the default page footer to ease getting things right,
but this is not mandatory.
When we want to write something to the output stream, we simply call self.w,
which must be passed a unicode string.
The latest function is the most exotic stuff. The point is that without it, you
would get an error at display time because the framework wouldn’t be able to
choose which footer to use between HTMLPageFooter and
MyHTMLPageFooter, since both have the same selector, hence the same
score… In this case, we want our footer to replace the default one, so we have
to define a registration_callback() function to control object
registration: the first instruction tells to register everything in the module
but the MyHTMLPageFooter class, then the second to register it instead
of HTMLPageFooter. Without this function, everything in the module is
registered blindly.
Note
When a view is modified while running in debug mode, it is not required to
restart the instance server. Save the Python file and reload the page in your
web browser to view the changes.
We will now have this simple footer on every page of the site.
Primary view customization
The ‘primary’ view (i.e. any view with the identifier set to ‘primary’) is the one used to
display all the information about a single entity. The standard primary view is one
of the most sophisticated views of all. It has several customisation points, but
its power comes with uicfg, allowing you to control it without having to
subclass it.
However this is a bit off-topic for this first tutorial. Let’s say we simply want a
custom primary view for my Community entity type, using directly the view
interface without trying to benefit from the default implementation (you should
do that though if you’re rewriting reusable cubes; everything is described in more
details in The Primary View).
So… Some code! That we’ll put again in the module views (myblog/views.py) of our cube.
from cubicweb.predicates import is_instance
from cubicweb.web.views import primary
class CommunityPrimaryView(primary.PrimaryView):
__select__ = is_instance('Community')
def cell_call(self, row, col):
entity = self.cw_rset.get_entity(row, col)
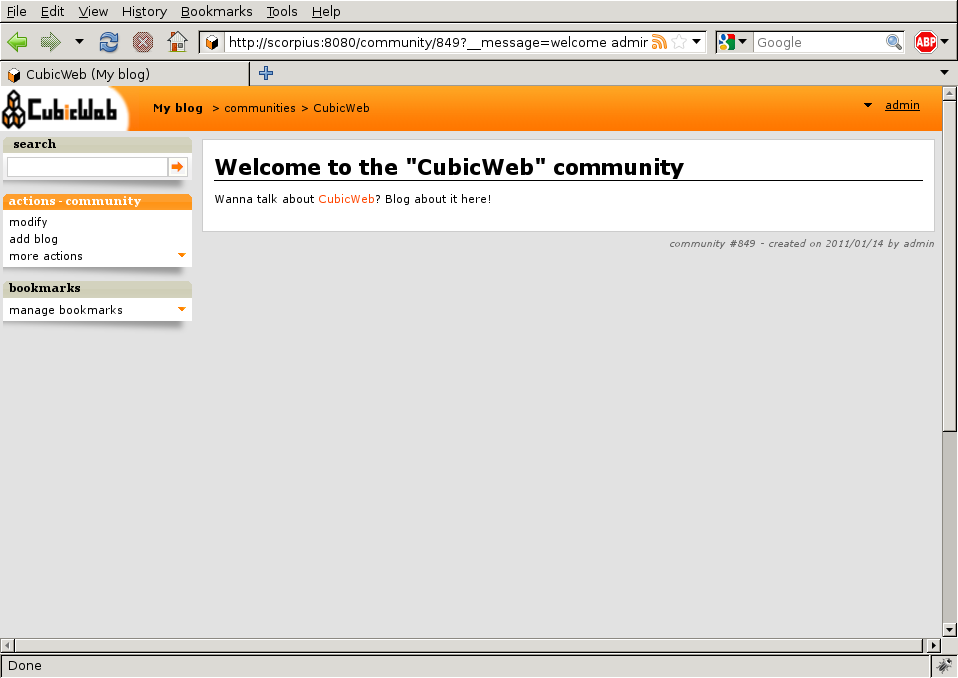
self.w(u'<h1>Welcome to the "%s" community</h1>' % entity.printable_value('name'))
if entity.description:
self.w(u'<p>%s</p>' % entity.printable_value('description'))
What’s going on here?
Our class inherits from the default primary view, here mainly to get the correct
view identifier, since we don’t use any of its features.
We set on it a selector telling that it only applies when trying to display
some entity of the Community type. This is enough to get an higher score than
the default view for entities of this type.
A view that applies to an entity usually have to define the method
cell_call as an entry point. This method will received the arguments
row and col that tell to which entity in the result set the view is
applied. We can then get this entity from the result set (self.cw_rset) by
using the get_entity method.
To ease thing, we access our entity’s attribute for display using its
printable_value method, which will handle formatting and escaping when
necessary. As you can see, you can also access attributes by their name on the
entity to get the raw value.
You can now reload the page of the community we just created and see the changes.
We’ve seen here a lot of thing you’ll have to deal with to write views in
CubicWeb. The good news is that this is almost everything that is used to
build higher level layers.
Note
As things get complicated and the volume of code in your cube increases, you can
of course still split your views module into a python package with subpackages.
You can find more details about views and selectors in Principles.
Write entities to add logic in your data
CubicWeb provides an ORM to easily programmaticaly manipulate
entities (just like the one we have fetched earlier by calling
get_entity on a result set). By default, entity
types are instances of the AnyEntity class, which holds a set of
predefined methods as well as property automatically generated for
attributes/relations of the type it represents.
You can redefine each entity to provide additional methods or whatever you want
to help you write your application. Customizing an entity requires that your
entity:
You may then want to add your own methods, override default implementation of some
method, etc… To do so, write this code in myblog/entities.py:
from cubicweb.entities import AnyEntity, fetch_config


class Community(AnyEntity):
    """customized class for Community entities"""
    __regid__ = 'Community'

    fetch_attrs, cw_fetch_order = fetch_config(['name'])

    def dc_title(self):
        return self.name

    def display_cw_logo(self):
        return 'CubicWeb' in self.name
In this example:
we used convenience fetch_config() function to tell which attributes
should be prefetched by the ORM when looking for some related entities of this
type, and how they should be ordered
we overrode the standard dc_title method, used in various place in the interface
to display the entity (though in this case the default implementation would
have had the same result)
we implemented here a method display_cw_logo() which tests if the
community title contains ‘CubicWeb’. It can then be used when you’re writing
code involving ‘Community’ entities in your views, hooks, etc. For instance,
you can modify your previous views as follows:
class CommunityPrimaryView(primary.PrimaryView):
    __select__ = is_instance('Community')

    def cell_call(self, row, col):
        entity = self.cw_rset.get_entity(row, col)
        self.w(u'<h1>Welcome to the "%s" community</h1>' % entity.printable_value('name'))

        if entity.display_cw_logo():
            self.w(u'<img src="https://docs.cubicweb.org/_static/logo-cubicweb-small.svg"/>')

        if entity.description:
            self.w(u'<p>%s</p>' % entity.printable_value('description'))
Then each community whose description contains ‘CW’ is shown with the CubicWeb
logo in front of it.
Note
As for view, you don’t have to restart your instance when modifying some entity
classes while your server is running in debug mode, the code will be
automatically reloaded.
Extending the application by using more cubes!
One of the goal of the CubicWeb framework was to have truly reusable
components. To do so, they must both behave nicely when plugged into the
application and be easily customisable, from the data model to the user
interface. And I think the result is pretty successful, thanks to system such as
the selection mechanism and the choice to write views as python code which allows
to build our page using true object oriented programming techniques, that no
template language provides.
A library of standard cubes is available from CubicWeb Forge `_, to address a
lot of common concerns such has manipulating files, people, things to do, etc. In
our community blog case, we could be interested for instance in functionalities
provided by the `comment and tag cubes. The former provides threaded
discussion functionalities, the latter a simple tag mechanism to classify content.
Let’s say we want to try those. We will first modify our cube’s __pkginfo__.py
file:
__depends__ =  {'cubicweb': '>= 3.10.7',
                'cubicweb-blog': None,
                'cubicweb-comment': None,
                'cubicweb-tag': None}
Now, we’ll simply tell on which entity types we want to activate the ‘comment’
and ‘tag’ facilities by adding respectively the ‘comments’ and ‘tags’ relations on
them in our schema (schema.py).
class comments(RelationDefinition):
    subject = 'Comment'
    object = 'BlogEntry'
    cardinality = '1*'
    composite = 'object'


class tags(RelationDefinition):
    subject = 'Tag'
    object = ('Community', 'BlogEntry')
So in the case above we activated comments on BlogEntry entities and tags on
both Community and BlogEntry. Various views from both comment and tag
cubes will then be automatically displayed when one of those relations is
supported.
Let’s install the cubes and synchronize the data model as we’ve done earlier:
$ cubicweb-ctl stop myblog
$ cubicweb-ctl shell myblog
entering the migration python shell
just type migration commands or arbitrary python code and type ENTER to execute it
type "exit" or Ctrl-D to quit the shell and resume operation
>>> add_cubes(('comment', 'tag'))
>>>
Then restart the instance. Let’s look at a blog entry:
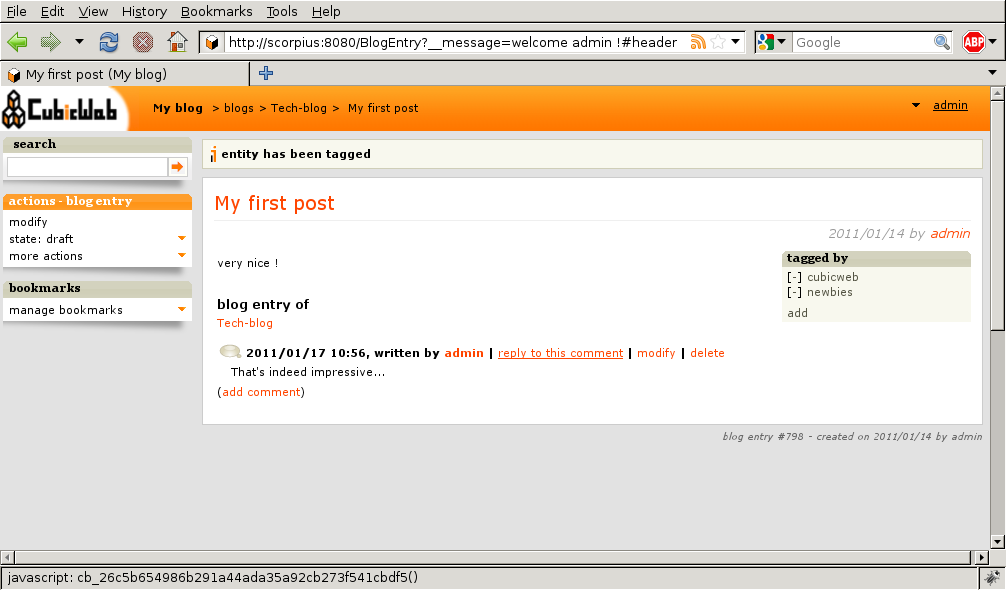
As you can see, we now have a box displaying tags and a section proposing to add
a comment and displaying existing one below the post. All this without changing
anything in our views, thanks to the design of generic views provided by the
framework. Though if we take a look at a community, we won’t see the tags box!
That’s because by default this box try to locate itself in the left column within
the white frame, and this column is handled by the primary view we
hijacked. Let’s change our view to make it more extensible, by keeping both our
custom rendering but also extension points provided by the default
implementation.
In myblog/views.py:
class CommunityPrimaryView(primary.PrimaryView):
    __select__ = is_instance('Community')

    def render_entity_title(self, entity):
        self.w(u'<h1>Welcome to the "%s" community</h1>' % entity.printable_value('name'))

    def render_entity_attributes(self, entity):
        if entity.display_cw_logo():
            self.w(u'<img src="https://docs.cubicweb.org/_static/logo-cubicweb-small.svg"/>')

        if entity.description:
            self.w(u'<p>%s</p>' % entity.printable_value('description'))
It appears now properly:
You can control part of the interface independently from each others, piece by
piece. Really.